Choosing Hardware
The ET/BWMGR software appliance is based on FreeBSD 13.2; if FreeBSD runs on your hardware you will be able to run our appliance. While any hardware will "work", many drivers and devices are better supported by the OS than others. Our hardware selection guide..What You'll Need to Burn the USB Image
To download and write the image, you will need a computer with internet access, running Linux, FreeBSD, Windows, or Mac OS X, and a USB flash drive of 4GB or greater size. Windows machines will need additional software to "burn" the image to the USB device.General Hardware Requirements
To boot and run the demo, you will need the following:- Intel or AMD 64 Bit CPU
- 2 or 3 compatible Ethernet interfaces for bridging (see the hardware list above.) While the system with work with only 2 interfaces, 3 is highly recommended for performance reasons.
- USB 2.0 ports and BIOS support for booting from USB flash drive.
- 8GB RAM, 16GB+ recommended
- Safari or Chrome Web Browser (to access the product GUI. Others may work also)
Watch the Installation Video
Note that this may be easier to see if you watch it on youtube.The Build Process
The USB contains an installer which builds a HDD with the OS and some tools needed to install the full BWMGR product. After the USB build process, you'll have a fully function freeBSD based appliance with the necessary tools to download and install a full appliance. This is what you'll be doing:1) Download the Demo Image and unzip it
2) Burn a USB.
3) Boot the USB on the target system
4) Build a base system HDD using the installer USB
5) Boot from the HDD
6) Run bwmgrSetup to build the DB and change passwords
7) Reboot the system
At this point you should have a FreeBSD 14 system with Apache and mySQL running. test the sytem
Step 1: Download the Demo Image
Downloading the Image
The ET/BWMGR installer is a disk image file (.img) that can be written directly to a USB or HDD and booted. The instructions are for a USB; however if you have a dual HDD system you can also write to a HDD.You must have an account to download the image. If you’re not currently a customer you can create an account. Once you have an account you can get the image with the download link.
Step 2: Burn the USB
If you already own an ET/BWMGR system, you can use our diskutil utility to burn the USB. You'll need to operate as root user.# unzip bwmgrInstaller.zip
You should now have the .img file in the current directory that is approximately 2GB. Plug in a USB drive and run diskutil to find the disk:
# diskutil list

ada0 [228936 MB] Patriot Burst (SBFM61.3) (GPT / Configured / Root)
da0  [29321 MB] SanDisk Ultra 1.00 (Blank)
USB drives are named da# in FreeBSD; the target drive is da0. The disk can be blank or not; whatever is on it will be overwritten.
90dev# diskutil da0 burn bwmgrInstaller.img

# diskutil da0 burn bwmgrInstaller.img
Writing bwmgrInstaller.img to /dev/da0: 1939865600 bytes:
|0---------------------50--------------------100|
##################
Skip to "Booting the USB"
Windows
Get DD for Windows here.Read the next section to learn how to use dd to build the USB.
Linux
You are writing a raw file system, so you need to write to the raw disk. Figure out the device with lsblk:# lsblk
NAME MAJ:MIN RM SIZE RO TYPE MOUNTPOINT
sda 8:0 0 223.6G 0 disk
├─sda1 8:1 0 222.6G 0 part /
├─sda2 8:2 0 1K 0 part
└─sda5 8:5 0 975M 0 part [SWAP]
sdc 8:32 1 3.7G 0 disk
├─sdc1 8:33 1 40M 0 part
├─sdc2 8:34 1 512K 0 part
└─sdc3 8:35 1 1.8G 0 part This system has 1 hard drives and the USB is sdc; determined by the size of the partition.
To turn the image, use dd to the raw drive, /dev/sdc
# dd if=bwmgrInstaller.img of=/dev/sdc bs=1MThis will burn the image correctly. To check after you burn, you can run sfdisk and it should show a FreeBSD Type:
# sfdisk -l
... bunch of info here...
Device     Boot Start   End Sectors  Size Id Type
/dev/sdd4  *        0 49999   50000 24.4M a5 FreeBSD
Skip to "Booting the USB"
Mac OS X
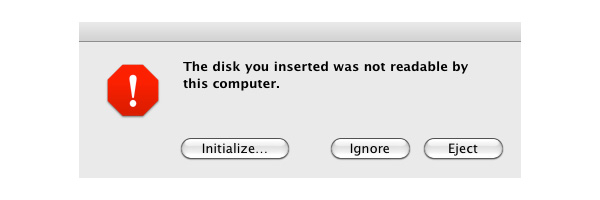
You will not need any special software to write the image. To download the image, click on the link in the ticket, and make note of the folder that it is stored in. Option-click on the download window to open the folder that the download is stored within. If the file is not automatically uncompressed after the download, double-clicking on the file will extract the image file.Insert your USB flash drive. You will not need to initialize, format, or partition the drive. If you see this prompt upon inserting your USB device:
Click Ignore to dismiss the message. Do not eject or format the drive.
Finding the Device Name
Open a terminal window, and run this command to list all detected drives:$ diskutil list
/dev/disk0
#: TYPE NAME SIZE IDENTIFIER
0: GUID_partition_scheme *250.1 GB disk0
1: Apple_HFS Macintosh HD 200.0 GB disk0s1
/dev/disk1
#: TYPE NAME SIZE IDENTIFIER
0: FDisk_partition_scheme *3.9 GB disk1
1: DOS_FAT_32 NONAME 4.0 GB disk1s1
The main system/root disk should be on disk0. In this example, our USB disk is named disk1. As with most newly-purchased USB drives, it has a MS-DOS format partition. Whether your USB drive is blank or formatted, you do not need to partition or format the drive.
if you insert a USB drive with MS-DOS or Apple HFS filesystem(s), they will be automatically mounted. You must unmount any such filesystems before you can write the image, and you must do so without ejecting the device. This is how to do that (again, using the example of disk1):
$ diskutil unmountDisk disk1If you mistakenly eject the device, simply remove and then re-insert the USB device.Next, in the same terminal window, change your directory to the folder where you downloaded the image. In this example, it is in the Downloads folder. In our example our device is disk1, so we must write the image to the raw device rdisk1. Please double-check your disk name to ensure you don't overwrite the wrong disk!
Replace "#" with the number of your USB disk!
$ dd bs=1m if=bwmgrInstaller.img of=/dev/rdisk#Writing the file can take anywhere from 3-15 minutes, depending on the speed of your flash device and USB controller. No information will be printed until the write is complete.When the write is complete, you may see the pop-up prompt again.
Click on Eject, and then remove the USB disk, which is now ready for use. If you accidentally click on "Ignore", then you can manually eject the disk with this command:
$ diskutil eject disk#Booting from the USB
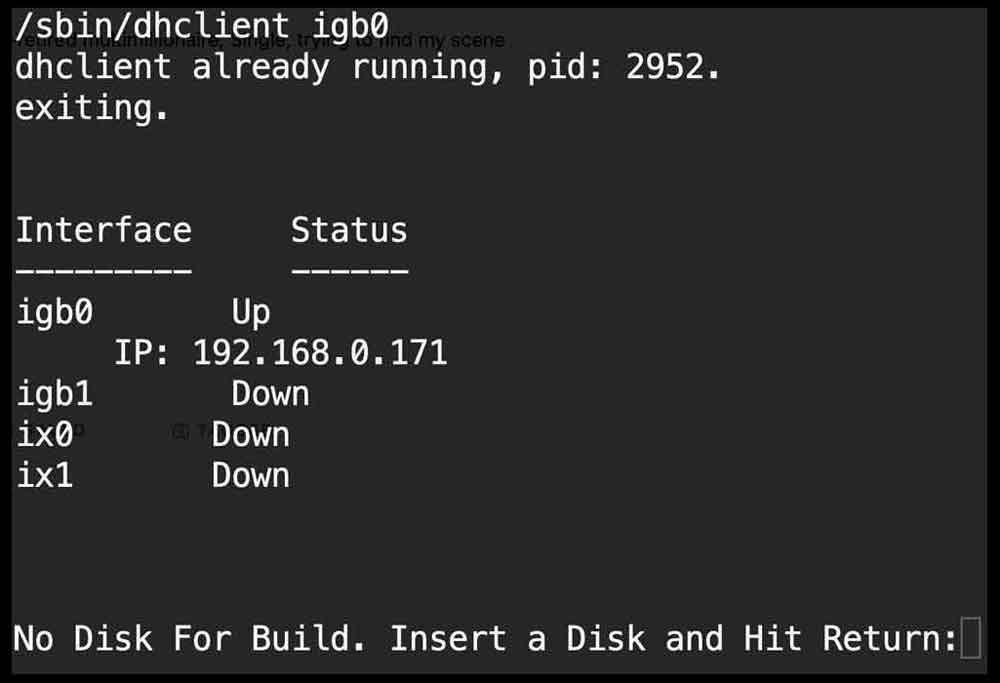
Once the network interfaces are installed, all that's left to do is plug your USB flash drive in the computer you will use for the demo. Make sure that the USB device is the first boot target. Enter the BIOS at boot (usually by pressing "del" or "F2" at boot, depending on the BIOS), and select your USB drive as the first boot device. This may be under the "Boot Order" menu, or some motherboards consider a USB flash drive to be a hard drive, so you must choose the USB device as the first hard drive in that case. If you have a hot swap HDD you can also just remove the drive while you boot so that the USB is the ONLY bootable device, in which case you won't need to mess with the bios.This shows that igb0 has the address 192.168.0.171 and the system is accessible on that address. Since its your DHCP server, the address should be accessible from machines on your network.
You can build the system right on the console if you want; or you can access the system on the IP indicated and build the system via Telnet or SSH.
To Log In:User: rootOnce logged in, you can run the installer from the terminal:
Password: saturn5
etbwmgr# bwmgrInstaller
No Disk For Build. Insert a Disk and Hit Return:
Building the System
If you have a hot-swap HDD system you can insert the disk now and hit return. If you installed your disk already you'll see something like this:No Disk For Build. Insert a Disk and Hit Return:
ada0 [119GB MB] OCZ-COLOSSUS (GPT / Configured)
da0 [15GB MB] Lexar USB Flash Drive (GPT / Configured / Root)
Select a non-Root Drive(ada0):
Build an EFI Disk? (y/n) (y/n)?: y
Preparing the Disk
This will completely erase the contents of ada0 and create the following partitions:
Main:
Enter 'yes' to continue: yes
Type yes and hit return and the installer will proceed to prepare the HD and install the system. This is when you can refresh your coffee.
x var/at/jobs/
x var/at/spool/
Done
Enter Boot Disk (ada0 or da0)(ada0):
When it’s done it will as for the boot disk; this will almost always be ada0. If you have a SAS or SCSI system you’ll want to enter da0 instead.
Next you will configure the system with a static IP address.
Configure Network? (y/n)?: y
Connect the administrative interface and press return

Select the interface you want to be your Administrative Interface

Interface     Status
---------     ------
igb0       Up
IP: 192.168.0.100
igb1       Down
xi0        Down
ix1        Down

Select Interface: igb0
IP Address(192.168.0.100): 192.168.0.155
Enter IP Mask(255.255.255.0):
Enter Default Gateway: 192.168.0.1
Enter DNS Server(8.8.8.8):
Enter Hostname: etbwmgr

Using the Following Values for :
IP Address: 192.168.0.155
IP Mask: 255.255.255.0
Default Gateway: 192.168.0.1
DNS: 8.8.8.8
Hostname: etbwmgr
Use these Settings? (y/n): y
Do you want to configure Bridging? (y/n): n

Installation Complete. Shutdown system (shutdown -p now) and remove the Installation disk before rebooting
You will set up your bridge after you’ve rebooted from the hdd.
Boot From the HDD
After logging in, you need to run bwmgrSetup, which will create the database and ask you to change the default password.# bwmgrSetupWhen you run bwmgrSetup for the first time, it will create a mysql database and the etbwmgr initial database. You’ll also be ableThe passwords for root and admin will all be changed to what you specify. You can change those passwords later to your needs. Note that if you run bwmgrSetup after you've installed the ET/BWMGR it will also set the GUI password; but it can't do that at this point.
If you get this you should be ready to install the BWMGR specific software.
Step 6: Obtaining a License
NOTE: THIS has changed. update in progress. Watch the video for current procedure.Whether you purchased a license or are requesting a demo, you'll need a license. In order to generate a license we need some info from the system. You can use the bwmgrLicense tool to request and install your license.
etbwmgr# bwmgrLicense help

Usage
bwmgrLicense show
bwmgrLicense check-license
bwmgrLicense license-request orderID
bwmgrLicense license-request AUTH_CODE
bwmgrLicense install-license
etbwmgr#
If you've purchased a license, you can use your Sales Order / Invoice number. If you're requesting a demo, you'll need to obtain an Authorization code from us via a Sales Ticket.
To request your license,
etbwmgr# bwmgrLicense license-request 20210001
Request Received. Ticket 6048514a9 Created

Access Ticket http://www.etinc.com/tickets/6048514a9
You'll have to wait for us to generate your license; you can run check-license to find out the status:
etbwmgr# bwmgrLicense check-license
Registration is Pending
etbwmgr#
Please note that we will not approve a license from a VPN, Proxy Server or Server Farm. You need to use your corporate network.
When your license is ready you'll see your license info when you run check-license:
etbwmgr# bwmgrLicense check-license
License:1580344513
Level:1000Mb/s
Expires:2022-03-01
Serial:06:60:37:04:d0:77:c3:34:9f:c0

Latest License is Not Installed
When you get this, you can use install license to install the license in the system:
etbwmgr# bwmgrLicense install-license
Installed License, checking...License is Installed
etbwmgr#
Once your license has been issued you should have access to the update server. You can use the bwmgrUpgrader tool to install the software on your system. If you've purchased a license, skip ahead to the "Installing the Full ET/BWMGR Software Package"
Step 7: Install the ET/BWMGR Demo Package
If you've purchased a license or replacement license, skip to "Installing the Full Package"etbwmgr# bwmgrUpgrader getupgrade
Updating Packages..
tar: Removing leading '/' from member names
x usr/local/etc/packages/IMAGES.conf
x usr/local/etc/packages/PKGS.conf
x usr/local/etc/packages/V8GUI.conf
...The upgrader is smart enough to know if you have a demo or a full license ans it will install the correct packages.
The "getupgrde" command will run the postinstall automatically; if something goes wrong you could run it manually.
etbwmgr# bwmgrUpgrader postinstallThe installation is now complete. Reboot the system and login in with your new password.Check to see that the driver loaded properly:
etbwmgr# bwmgr -v
stdClass Object
(
[driver_version] => 8.03
[cli_version] => 8.03
)
etbwmgr#
Step 8: Setting Up The ET/BWMGR
Setting the GUI PasswordNext set the GUI passwordbwmgr# bwmgr guipassword admin PASSWORDYou should now be able to access the GUI with your browser and log in with admin/PASSWORDTesting The Bridge
If you've set up bridging, you should now test it to make sure it's working. First, check to see that it was successfully set up:etbwmgr# ifconfig bridge0
bridge0: flags=8843 metric 0 mtu 1500
ether 02:a1:52:d4:d1:00
nd6 options=21
id 00:00:00:00:00:00 priority 0 hellotime 0 fwddelay 0
maxage 0 holdcnt 0 proto stp maxaddr 2000 timeout 1200
root id 00:00:00:00:00:00 priority 0 ifcost 0 port 0
member: igb2 flags=2000
ifmaxaddr 0 port 0 priority 0 path cost 0
member: igb1 flags=2000
ifmaxaddr 0 port 0 priority 0 path cost 0 Specifically check the "members" to make sure they are correct. Connect the member interfaces and pass some data; you can do this by plugging your outside interface to a switch and the other to a PC or laptop, and then pinging something.
Adding Your First Rule
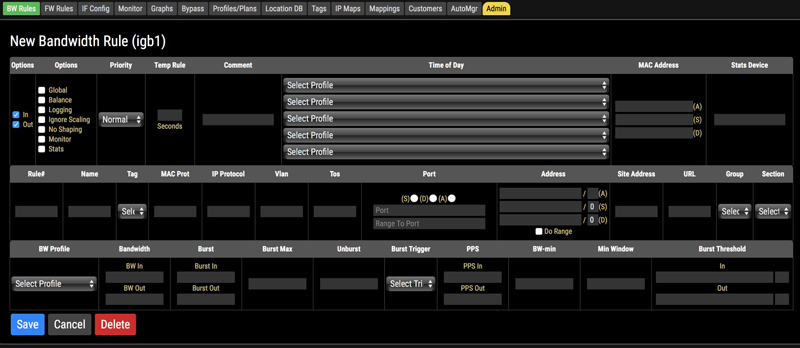
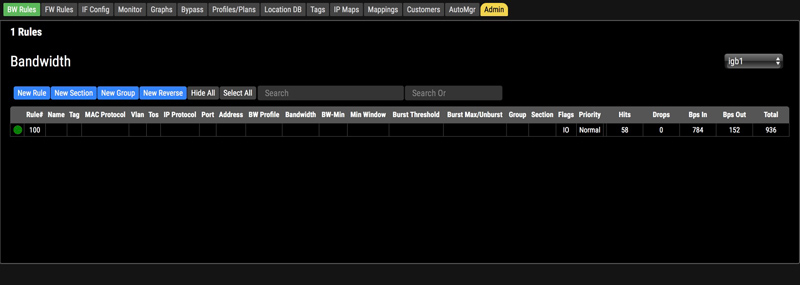
To determine that the bwmgr is able to manage traffic, you should add a simple rule to make sure you're getting "hits". Go to the BW Rules tab and press New Rule.You'll see that In and Out is checked; the default is for the rule to match all traffic. Just save the rule and you should see this.
If there's traffic going through the bridge, you should get hits on the rule. Your system is ready to manage traffic.


