
This document is the "User Guide" for the ET/BWMGR product version 8.0 and above. Note that this document is a work in progreas.
Getting Started
If you're building a Software Appliance on your own hardware, please refer the the Software Appliance Manual which will guide you through downloading the installation image to configuring the hardware.Initial Setup of the Appliance
Refer to the Appliance Quick Start guide to aid in setting up the appliance. You'll need to set up the network, passwords, your time zone and boot up settings.All About V8 Paths
You'll need to set up at least 1 path for your system to function properly as a traffic shaper. A path is a traffic stream that is managed by the BWMGR software. You set up paths between interfacesMost systems will have a single, simple path between 2 interfaces representing the data flow. Suppose your have our 10g Fiber Bypass Card. Your path would be like this:
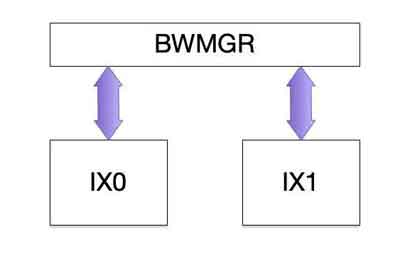 When the BWMGR is enabled, a path is a direct link to the interface. Packets will be received and transmitted by the BWMGR completely bypassing the system network stack.
Previous versions of the ET/BWMGR used interfaces as the "glue" to the operating system; usually to a bridge or the TCP/IP routing stack. Version 8 replaces this with Paths.
System Configuration
Setting the Time Zone
The time zone must be set for both the Operating System, as well as in the PHP configuration. If the time zone is not properly set, usage graphs and other features like quotas and bandwidth usage reports may not work accurately.System Time Zone
In FreeBSD, you can set the system time zone from the command line, using the "tzsetup" program.# tzsetupThis will bring up a series of text dialog boxes, which can be navigated by the arrow keys. Choose the proper geographic area to narrow down the selection list. After confirming the time zone is correct for your location, check the system time and adjust it if necessary. Take note of the time zone selected, and the format (Region / City). This is the format you will need to use when setting the time zone for PHP in the next step.Examples:
America/New_York
Africa/Dar_es_Salaam
Asia/Dhaka
Europe/Budapest
PHP Time Zone
Edit the file /usr/local/lib/php.ini, and find the line that sets the time zone. A factory-default time zone will be set to the US Eastern time zone like so:date.timezone="America/New_York"
Change the time zone setting to match the System time zone. After you change the PHP time zone, you should restart Apache so it can register the new setting.
# apachectl restartSetting the Time and Date
From the console (or using the Terminal Tab). log in and use the date command to set the time:# date YYMMDDHHMMFor example# date 2505031800will set the date to May 3, 2025 18:00. Make sure you set the time zone first.Setting your Subnet Parameters
The ET/BWMGR incorporates a powerful algorithm which indexes rules for ultra-fast lookup. Subnets rule provide a challenge because there are many addresses in a subnet. The algoritm requires a "seed", so we need to know about the widest subnet youll be using. There are 2 sysctl variables defined:bwmgr.v6_min_prefix: 48
bwmgr.v4_min_prefix: 24
There are the default values. These represent the number of bits that are ALWAYS significant in the addresses in your rules. If you are using ipV4 subnets that are breater than 8 bits (ir ipv6 subnets greater than 16 bits), you'll need to change these settings.
Example:
Supposed you are have rules that will use a /10 ipV4 subnets. In the file /etc/sysctl.conf. you'd need to add:
bwmgr.v4_min_prefix=22You will have to reboot for this to take effect. You can verify the settings using:# sysctl -a | grep min_prefixSetting the maxbuffers parameter
The maxbuffers parameter will put a cap on the number of buffers that the bandwidth manager will use to store managed data in its limiting or prioritization queues. The purpose of this parameter is to keep the bandwidth manager from exhausting your system of network buffers. It can be also used to limit the amount of backup traffic that the bandwidth manager will manage. Typically, this number should be somewhat lower than the number of system buffers you have available for network frames.You can check to see how many buffers are allocated in your running kernel with the following command, which will print the number of mbuf clusters allocated in your system:
# sysctl -a | grep clusterskern.ipc.nmbclusters: 40000To change the setting, you can set the number of clusters to use at boot time by putting a line like the following in /boot/loader.confkern.ipc.nmbclusters="60000"If you're unfamiliar with 'BSD architecture, BSD systems use mbufs for network traffic. mbufs are chained, which seemed convenient when we had 50Mhz memory busses, but now most high speed traffic use mbuf Clusters. Clusters are contiguous 2K blocks; when traffic arrives via ethernet, the data is always stored in a cluster.Remember that each cluster is 2K, so you can't allocate an infinite number of buffers. Previous to FreeBSD 9, FreeBSD allocated a fixed amount of ram to the kernel; 1/3 of system ram by default in most cases. Newer versions are a bit smarter; but note that mbuf clusters are NOT pre-allocated. So if you allocate 10 million buffers it won't tell you that it can't do it. It will allocate them in bunches as needed, and if your system runs out of memory, bad things will happen. 100,000 mbuf clusters will use 200MB of ram. 100K is the default MAX_BUFFERS setting in v8.0.
After determining the buffer allocation in your system, you can then use "netstat -m" after initial boot to see how many buffers your system uses with no traffic (this will vary depending on what cards and devices you have in your system. Suppose your system uses 700 clusters after boot. You could set your maxbuffers setting to say 15000 (which is less than 16000 - 700).
You can see the maxbuffers setting using the 'bwmgr status' command in the CLI, or in the Settings tab in the GUI.
# bwmgr status

stdClass Object
(
[bwmgr_status] => stdClass Object
(
...
[max_buffers] => 100000
[bufs_in_use] => 17480
[high_bufs] => 100000
...
)
)
The output shows the maxbuffers is set to the default of 100000, and that 17480 buffers are currently in delay queues. It also shows high_bufs at 100000, which tells you that you're hitting your limit and you should consider increasing the MAX_BUFFERS setting.
To reset high_bufs, issue the following command from the CLI:
# bwmgr set max_buffers clearSetting max_streams
"Streams" are traffic flows, similar to sessions; "conversations" tracked by the software. Streams are allocated dynamically, so they use up memory. . A large ISP can easily have over 100K streams. If you see your high streams reaching your max streams setting, you can increase max_streams as long as you have memory available. A stream is roughly 900 bytes of memory.# bwmgr set max_streams 150000The above would set Max Streams to 150000. Note that this also resets high streams, so if you simply want to reset high streams, you can do so by setting max_streams to the current value.Max Delay Queue Length
If you see messages in your system log (/var/log/messages) or on the console that your queue is full, you may need to increase your queue size. Packets that overflow the queue will be dropped. Note that delaying an infinite number of packets is not what you want to do, so if the number is very high you might want to find out what's going on with a network analyzer.Queue lengths are set when rules are created, so you can set the max_queue and then re-create the rule rather then re-booting if you just have a problem with 1 rule. To set the setting at boot, you'll need an entry in the /etc/sysctl.conf file:
bwmgr.max_qlen=5000ET/BWMGR Startup
On boot, the ET/BWMGR is started by the startup file /usr/local/etc/rc.d/bwmgr. It runs bwmgrStartup, which reads the /etc/rc.bwmgr file which contains the rules. If the variable:BWMGR_ENABLE="YES"is set in the file /etc/rc.conf. If the variable is not set, you can run the startup script manually:# bwmgrStartupor you could also fun the /etc/rc.bwmgr script directly:sh /etc/rc.bwmgrbwmgrStartup just reads and runs the script using the API 100s of times faster. If you have 1000 rules it may teke minutes to run the script in the shell, or just seconds with bwmgrStartup.Starting the BWMGR
The last line in the /etc/rc.bwmgr script is the command that starts the ET/BWMGR process:/usr/local/bin/bwmgr setkeyifac igb0
/usr/local/bin/bwmgr load_protocols
/usr/local/bin/bwmgr set max_streams 125000
/usr/local/bin/bwmgr set max_buffers 100000
/usr/local/bin/bwmgr start
This requires that you've installed a valid license in /usr/bwmgr/BWMGR_LICENSE. If you purchased a hardware appliance the license is pre-installed. If you built your own the procedure for obtaining a license is described int the Installation instructions.
Adding Rules
The bwmgr rule syntax is very extensive, and will be illustrated throughout this document in the appropriate section. We're going to keep it simple here, using only a subset of the commands available.Basic Syntax
bwmgr [-x rulenumber] criteria [bandwidth controls / actions] [options] criteria is the method for matching specific traffic, the actions can refer to a bandwidth limit or priority, and options refers to such features as statistics.Basic Criteria
| Setting | Description |
|---|---|
| -i -o | Incoming or Outgoing. Both are set by default |
| -d | Disable the Rule |
| -x Rulenumber | The Rule Index |
| -name Rulename | Optional Rule Name |
| -fw | Rule is a Firwall Rule |
| -g | Rule is a global rule (see precedence below) |
| -addr IP_ADDRESS/PREFIX | IP Address with optionsl subnet/prefix |
| -port PORT | Port number or name in /etc/services |
| -ipprot IPPROT | IP Protocol (TCP, UDP, ICMP, etc) |
| -protocol PROT | Protocol |
| -bwprofile PROFILE | Bandwidth Profile to Apply |
| -bwin BW -bwout BW | Bandwidth Settings (if no Profile) |
| -graph | Save Statistics for Graphing and/or Billing and Quotas |
We'll be using the "bwmgr rebuild" command in our examples; this command can be used to display the current ruleset in its entirety. This will be described in more detail later.
Rule Precedence
Each rule has an "index", which is a number which defines its precedence. Rules are processed from low indexes to high, so the lower the index, the higher the precedence. Once a rule "hits", or matches a packet, rule processing stops, and the action (if any) specified by that rule is carried out. Exceptions to this behavior are rules with the "-global" option, or the "-logonly" option. A gobal rule allows for subsequent matches (and actions) for a given packet, which allows for some more powerful combinations of rules and actions. A log-only rule is a rule that performs no action, but simply enters the packet details in the log when it matches.Use the -x parameter to specify an index. Consider the following ruleset:
# bwmgr -x 100This creates a rule with an index of 100. If you specify a rule without an index, the system will create an index at the end of the ruleset. So the command:# bwmgr -addr 192.168.0.10This command will insert the rule at the end of the ruleset with an index 100 greater than the last rule.# bwmgr rebuild | grep -- -x
/usr/local/bin/bwmgr -x 100
/usr/local/bin/bwmgr -x 200 -addr 192.168.0.10
There's a more advanced way to auto generate indexes into "sections" which will be described a bit later.
Lets consider Rule Precedences. Sometimes multiple rules will match, so precedence will determine which rule is implemented. Consider the following ruleset:
bwmgr -x 100 -addr 192.168.0.10 -bwprofile foo
bwmgr -x 200 -addr 192.168.0.10 -bwprofile bar
Note that -addr matches the address in either direction; whether it's the source or destination address in the packet. Suppose a packet with a source address of 192.168.0.10 comes in. It will match b oth rule 100 and rule 200. But because 100 has the lower index, the profile foo will be applied and not bar. Rule 100 will "hit" and rule 200 will not. In fact, with these 2 rules, rule 200 will never "hit" unless rule 100 is disabled.
Large Rule Indexes
Auto-indexing will not consider rules with indexes of 1 million or greater when determining the next highest index. This allows you to specify rules that MUST be at the end of your ruleset, while still using auto-index. For example, suppose you have 2 rules:# bwmgr igb0 -x 100 -addr 10.1.1.1 -bwboth 256000# bwmgr igb0 -x 1000000 -ipprot allip -priority discardNow, you add another rule using auto-index:# bwmgr igb0 -addr 10.1.1.2 -bwin 512000 -bwout 512000This rule will be assigned index 200, so your rule 1000000 would still be at the end as required.Global Rules
Before Global rules were introduced in v3.24, rule index precedence was absolute. With global rules, its possible for a data frame to match multiple rules, which is useful both for statistics and control. Global rules are set with the -global option.# bwmgr igb2 -x 100 -ipprot tcp -global [ matches all TCP traffic ]# bwmgr igb2 -x 110 -ipprot telnet -global [ matches Telnet traffic ]# bwmgr igb2 -x 120 -addr 10.1.1.1 [ matches traffic to or from IP address 10.1.1.1 ]Now suppose a telnet packet originating from 10.1.1.1 is received. If -global was not specified on rule 100, the packet would "hit" and rule processing would stop there. But since 100 and 110 are both global rules, all three rules will "hit" on the same packet.Note that is makes no difference where the global rule is located in the ruleset; a global rule will always hit on a match, so the following:
# bwmgr igb2 -x 110 -ipprot telnet -global# bwmgr igb2 -x 120 -addr 10.1.1.1# bwmgr igb2 -x 300 -ipprot tcp -globalwould make no difference; all 3 rules would "hit". Note however this next case:# bwmgr igb2 -x 300 -addr 10.1.1.0 -global# bwmgr igb2 -x 310 -addr 10.1.1.1# bwmgr igb2 -x 320 -ipprot tcpIn this case, the telnet packet would only hit on 300 and 310, since rule 320 is not global. Only the first non-global rule (rule 310) will hit, and it does so by rule precedence.Naming Rules
Names function as aliases to rule numbers and are used to uniquely identify rules for links with other rules. Names must be unique for the entire system. If you will be graphing the data from a particular rule (see the -graph option below), a unique name is required. Also note that names are case insensitive in the database, so if you have rules named "ACME" and "acme" they will be considered the same for graphing (and it will cause problems). Groups must also be named and the same issues apply; names must be case insensive unique. In order to modify or view a particular rule, you need to specify the index number or the name that is assigned to the rule when you create it. To make things easier, you can name entries and use the name to modify or refer to specific rules without having to know the index number. To name an entry, use the -name option:# bwmgr igb0 -name GenMotors -x 300 ...the above entry will associate the name GenMotors with this rule at index 300. So, for example, if you wanted to modify this rule in the future, you could simply do the following:# bwmgr igb0 -name GenMotors ...criteria...Note that names must be no more than 16 characters long and cannot include spaces or any non-alphanumeric characters other than a dash or underscore. Using periods in rule names should be avoided.Specifying Hosts and Network Addresses
You can create rules for host addresses and networks with the BWMGR to limit the amount of bandwidth that a specific host or network can use. This is done as follows:# bwmgr igb0 -addr 207.11.14.1 -bwout 56000 -bwin 56000This would limit the traffic from and to host 207.11.14.1 to 56000bps. Similarly, an address mask can be used to specify an entire network or sub-network:# bwmgr igb0 -addr 207.11.14.0 -addrmsk 255.255.255.0 -bwout 56000 -bwout 56000This would limit the bandwidth of all of the devices on network 207.11.14 to an aggregate of 56000bps. You can also use host/domain names for specific hosts. For example, to limit traffic of a specific host by name:# bwmgr igb0 -addr www.sumdomain.com -bwout 128000 -bwin 128000Note that if you use internet host.domain names, the name is resolved to a host address at the time the rule is added. Assuming "domain.com" resolves to 10.1.1.1# bwmgr igb0 -addr domain.comthis rule will be equivalent to# bwmgr igb0 -addr 10.1.1.1No attempt is made to resolve numbers to hosts, so the numeric host will be saved in your ruleset.MAC Address Rules
You may want to lmit an entire physical machine, or a customer by his router's MAC address. Assuming that you know the MAC address of the specific machine, you can specify the MAC address using the -maddr option in the same way that you can limit by IP address. For example:This rule would limit all of the traffic to and from the host with MAC address 00:00:00:c0:a2:bc to 64kb/s. MAC rules match all of the traffic from or to the specified MAC address, including non-IP traffic.
# bwmgr igb0 -maddr 00:00:c0:a2:ca:bc -bwin 64000 -bwout 64000Alternatively, you can use -smaddr and/or -dmaddr to control a specific connection.# bwmgr igb0 -smaddr 00:00:c0:a2:ca:bc -dmaddr 00:00:c0:01:01:01# bwmgr igb0 -maddr 00:00:c0:a2:ca:bc -bwin 64000 -bwout 64000The above rule pair would limit all of the traffic for MAC 00:00:c0:a2:ca:bc except traffic going from this address to 00:00:c0:01:01:01.Grouping Bandwidth Entries - Creating a Group
If you want to define a disjointed group of addresses, you can use the "Group" feature to create a group. Groups MUST be named when they are created. Rules can then be linked to the group by name:Here, we define a group, and give it a name and a bandwidth setting (128kb/s symmetrical).
# bwmgr igb0 -name losers -group -bwin 128000 -bwout 128000# bwmgr igb0 -addr 207.11.1.4 -bwlink losers# bwmgr igb0 -addr 207.11.17.2 -bwlink losers# bwmgr igb0 -addr 207.11.17.3 -bwlink losersthe above would create a group with the 3 specified addresses which would all have the same aggregate bandwidth limits, as if they were all in one rule. Note the use of the -name parameter for the initial (group) entry. You must use the name of the entry when linking to a group head (previous versions allowed the index to be used). Using the name allows for group members to be on different interfaces. Note that if you delete the Group entry the other entries will continue to exist with an unattached link, and they will re-attach when a group rule with the proper name is added. You should avoid deleting group entries when possible, as the remaining rules will work differently (in the above case they will get unlimited bandwidth) when they are not in the group.More powerful use of groups is discussed in the Group Bandwidth Management section below.
Managing Traffic by Data Type
Traffic can be identified by "traffic type" as well as by previously described IP or MAC addresses. Traffic types can also be specified along with addresses to identify specific traffic sent by or to specific hosts or customers.MAC Protocol Rules
The "MAC protocol" is the "ethernet type" in an ethernet frame. While virtually all of your "internet" traffic is IP, you may have many other types of traffic on your LAN. If you have co-located customers, if you are bridging your traffic to remote locations or if you just want to control certain types of LAN traffic, the MAC protocol can be used to identify such traffic. The syntax for specifying MAC traffic is as follows:# bwmgr igb0 -mprot ProtocolWhere "Protocol" is the hexidecimal representation of the ethernet type (ie 0x800 or 800 for IP, 0x806 or 806 for ARP, etc). The more common MAC types (IP, ARP, IPX) may be specfied by keyword.There are 2 special types. First is "-mprot vlan", which matches all vlan tagged traffic. Note that such rules will only match vlan encapsulated traffic that contain the vlan header. The second is "-mprot 802.3", which is "typeless" ethernet traffic. Some older protocols (and IPX implementations) may specify the length instead of the protocol type. Specifying 802.3 will match all such traffic, regardless of the higher level protocol.
VLAN (VPN) Rules
You can also match based on the vlan tag (ie the vlan ID number) using the -vlan option. For example:# bwmgr igb0 -vlan 128 -bwboth 256000will limit traffic containing vlan header info for vlan 128 to 256000. Note that -vlan implies -mprot 0x8100 and that any other setting of -mprot is not valid.IP Protocol Rules
All IP traffic has an IP protocol. The most common IP protocols are TCP, UDP and ICMP, but there are many more. Most likely, you will not encounter anything different than these "big 3". Other IP protocols are listed in the file /etc/protocols on most unix-like installations.To match traffic with a specific IP protocol, use the -ipprot criteria. The following are examples of how to match "the big 3":
# bwmgr igb0 -ipprot UDP# bwmgr igb0 -ipprot ICMP# bwmgr igb0 -ipprot TCPNote that port-defined and special internally defined protocols can also be specified with the -ipprot setting. These are discussed in the protocol engine manual.Other IP Protocols
It's not very useful to shape traffic based on their base IP protocols, so protocols are further decoded based on their content or what TCP/UDP port they're running on. Examples are http, ftp, p2p, video, voip and some derivatives of those protocols, such as http-image and bittorrent.A more comprensive discussion of IP Protocols, Tags and how to map traffic to protocols is in the Protocol Engine document.
Tags
Tags are described in the Protocol Engine section. Tags are text representations of various traffic flows that have been identified using one or more criteria. To match a tag, use the -tag option with the desired tag:# bwmgr igb0 -tag adminsThe would match the tag "admins", which may be the IP Addresses of authorized admins:ip_address: 10.1.1.1 tag:admins
ip_address:10.1.1.64 tag:admins
ip_address:192.168.11.17 tag:admins
IP TOS Rules
You can use a mask to match bits in the TOS field of ipv4 packets with the -iptos option. Since TOS is used in many different and sometimes non-standard ways, it is your responsibility to set the mask according to whatever scheme is in place on your network. Note also that this HEX value Matches the entire TOS octet, meaning both TOS and priority fields. For example:# bwmgr igb0 -iptos 0x18 -global -priority 8The above rule will set the global priority (explained later) to 8 for any packets containing either the LOW_DELAY (0x10) or THROUGHPUT (0x08) bits. This implies that 0x10, 0x08 and 0x18 and 0x1E will all match.IP Protocol Port Rules
While you can use ports in rules to match traffic, its more efficient to use protocol mappings than to use ports. Virtually all port matching has been antiquated by the protocol engine. You can still use -port to match a port if the protocol isn't defined, but its recommended that you use -ipprot in most cases."Special" Protocol Definitions
There are several "special" ip protocols defined that arent really IP protocols at all, but they can be quite useful. "Special" protocols are specified with the -ipprot syntax, although some of them actually combine protocols and ports. They represent special cases that are common and they are not definable by protocol and port alone:
tcpconnect  Matches SYN requests only

tcpsyn  Matches any packet with a SYN (including ACKS)

tcpack  Matches packets with an ACK flag

tcppush  Matches TCP packets with the PUSH flag (containing data)

allip  Matched all IP packets (NOT ARPS or other ethernet prots

ipfragments  Matches packets that are fragments
URL Rules
URL rules are special rules that look into HTTP and FTP frames and match requests for specific pages or files. URL rules specifically match 2 types of traffic: HTTP GET or POST requests for specific URLs and FTP RETR requests. These can be useful in filtering known attacks (ie default.ida or root.exe), and also for controlling downloads of specific pages or specific types of pages. Suppose Microsoft just released IE 12.0. You could limit only downloads with a "-url iesetup12" rule possibly. Or "-url .exe" to limit all executables. URL rules will "track" any session that is encountered using the URL. So, for example, if you wanted to limit the download or tarballs, you could use:# bwmgr igb0 -url .tgz -bwin 64000 -bwout 64000This would be all that would be necessary to limit the entire download of any file containing ".tgz". ".mp3", ".mpg", ".avi", ".wmv" are other useful choices.URL rules may contain spaces. If a url contains spaces, it must be enclosed with quotation marks:
# bwmgr igb0 -addr 10.1.1.1 -url "The Quick Brown Fox"There is a setting urldecode "URL Decode" that can be enabled to cause the system to read the parameters string as well as the url. So if you wanted to block an exploit such as "?file=http://www.url.com", with URL decoding enabled, you could use:# bwmgr igb0 -fw -url "file=http" -priority fw-denyTo set url decoding, use the command:# bwmgr set urldecode on|offwhere on enables and off disables this feature.Site Rules
New in v5.0 is -site rules. These match HTTP host parameter returned in headers. It's important to understand that the site address is NOT contained in the url.While you might type this in your browser:
http://www.domain.com/someurl.htmonly the "/someurl.htm" is received as data in a packet. The site name is resolved via DNS, so in order to get the site name for a GET request you must get it from the HTTP headers.bwmgr igb0 -site facebook.comThe above rule will match http traffic with a host header specifying facebook.com. Note that the site specifier will match any host that matches the fragment. So "facebook.com" would match both "www.facebook.com" and "advertising.facebook.com".Enabling and Disabling Rules
You may want to disable a rule temporarily to allow someone into your network or allow someone out. To disable a rule, use the following syntax:bwmgr igb0 disable ####
bwmgr igb0 disablefw ####where #### is the rule number to disable. disablefw is used to disable firewall rules. Note that disable internally flags the rule as disabled, and you must use enable to re-enable the rule (unless you delete it and re-add it of course). To reenable a rule or to change its I/O flags, use the enable keyword:
bwmgr igb0 enable 1000
bwmgr igb0 enable 2000 I
bwmgr igb0 enable 3000 O
bwmgr igb0 enable 4000 IO
for the above commands, rule 1000 will be enabled as Incoming and Outgoing (the default), rule 2000 as incoming only, rule 3000 as outgoing and rule 4000 as both. There is no danger in enabling a rule which has not been disabled; in fact you can use enable to change the flags for any rule.
Enabling and Disabling Rule by Time of Day
For an in depth discussion of Time Profiles for rules, please see Time of Day Profiles.Notes on Logging
Adding the "-l" option enables packet logging for all traffic that matches the rule. Due to its high demands on cpu time and disk usage, this is not a feature that should be enabled on a typical rule. It's a powerful tool for debugging or identifying unusual traffic, intrusion detection, and finding traffic that hasn't matched any previous rules. Excessive logging (such as applying logging to a rule that matches all traffic to a host or subnet) will consume system resources, as every frame that goes to or comes from that host/net will be logged,More acceptable uses include scenarios like the following:
Suppose you wanted to know what connections a specific employee of yours was making. You could use the following rule:
# bwmgr igb0 -addr 207.14.172.1 -prot tcpconnect -lThe above rule would log all TCP connect requests from host 207.14.172.1. By specifying only the tcpconnect IP protocol, you have significantly reduced the amount of hits for this rule.The information from rules with logging enabled will be sent to LOG_INFO in FreeBSD (kern.info in syslogd). Typically, these are logged to the file /var/log/messages.
ET/BWMGR Protocol Engine
The ET/BWMGR protocol engine is described in detail in a separate document.The ET/BWMGR Firewall
Setting up the Firewall - Theory of Operation
The ET/BWMGR software incorporates a firewall ruleset which is separate from the bandwidth management rules. Each manageable interface on your system can optionally be assigned firewall rules, which can help you to control the flow of traffic to and from your network.The purpose of a firewall is to decide which packets are allowed to pass through the network and which packets are not allowed. The default is to allow all traffic. So, if you have no firewall rules enabled, all traffic will pass through the firewall. Typically, you will add rules for traffic that you want to "firewall", or filter, from getting into your network. For example, suppose you don't want anyone on the outside world to access your server whose IP address is 207.11.14.1. You could do the following:
bwmgr igb0 -fw -addr 207.11.14.1 -priority fw-denythe above syntax selects interface igb0 (which would have to be the interface connected to the outside world), uses the -fw flag to specify a firewall rule, and selects the address as the match criteria. The "priority" for firewall rules can be fw-deny, fw-allow or log-only. log-only rules will be discussed later. For now, you can either set a rule to allow, or to deny passage through the firewall. The above rule will cause all traffic to or from 207.11.14.1 to be discarded. This results in this address being inaccessable from outside of interface igb0.Firewall Criteria
Firewall matching criteria are similar to bandwidth rules, and include IP address, MAC address (source and/or destination,) port, port range, and protocol. Combinations of criteria are allowed, to allow for very specific matches, such as:- Destination IP address and Destination Port : match traffic to a port on this IP
- IP Address and MAC Address : Match only if the IP is using the provided MAC
# bwmgr igb0 -x 99 -addr 207.11.14.2 -port 4718 -priority FW-Allow# bwmgr igb0 -x 100 -addr 207.11.14.2 -portrange 1024 65535 -priority FW-DenyBecause rule 99 is before rule 100, it will be checked before rule 100, so you have effectively excluded port 4718 from the range in rule 100.Although Firewall rules use the same criteria as bandwidth rules, certain options, such as bandwidth management and statistical parameters are not allowed.
Viewing Firewall Rules with bwmgr
To view a firewall rule, use the getfwrule CLI command# bwmgr igb0 getfwrule 100stdClass Object(
[ruleinfo] => stdClass Object
(
[ifname] => igb0
[incoming] => 1
[outgoing] => 1
[fw] => 1
[index] => 100
[idx] => 6870
[hits] => 0
[priority] => Discard
[drops] => 0
[addr] => 11.1.1.1
[addrmsk] => 255.255.255.255
[bwinfo] => stdClass Object
(
)
[burstmax] => 0
[bps] => stdClass Object
(
[bps_in] => 0
[bps_out] => 0
)
)
[cmd] => getrule
)
Log-only Firewall Rules
Firewall rules can be given a priority of "log-only", which means that a log entry will be written when the rule matches, but subsequent rules will still be checked. It is important to position log-only rules before allow/deny rules, because once an allow or deny rule hits, then no more rules will be checked. A good strategy is to put all of your log rules at the beginning.# bwmgr igb0 -x 10 -fw -prot tcp -port snmp -l -priority log-onlyYou must specify -l to enable logging in addition to log-only, it is not automatic.Reverse Firewall Rules
Reverse firewall rules allow you to use a "trigger rule" to block host addresses based on some action. There rules are described in detail in the reverse rules section below.Setting up Bandwidth Management Rules
Setting Bandwidth Rules and Limits with the bwmgr utility
Bandwidth managment rules allow you to customize the way that certain traffic flows through your network. The following section describes how to use the bwmgr utility to set up your bandwidth management criteria. We will start with a brief listing of all of the options that apply limits or bandwidth settings to a rule. See the ET/BWMGR v5.0 CLI Manual for brief descriptions of each setting.-bwin ARG
-bwout ARG
-bwboth ARG
-bwmin ARG
-burstmax ARG
-bwburst ARG
-bwburst_in ARG
-bwburst_out ARG
-bwprofile ARG
-burstthresh ARG
-burstthresh_in ARG
-burstthresh_out ARG
-burstperiod_in ARG
-burstperiod_out ARG
-min_window ARG
-autothresh_in ARG
-autothresh_out ARG
-autoperiod_in ARG
-autoperiod_out ARG
-bursttrig ARG
-ppsin ARG
-ppsout ARG
-ppshi ARG
-wdwthresh ARG
Shared vs Allocated Bandwidth
All bandwidth that is not guaranteed is considered by the ET/BWMGR to be "shared" bandwidth. What this means is that bandwidth that is not used by one rule or policy may be used by any other rule on a demand basis. Guaranteed bandwidth must be allocated for a specific policy and will not be available to other policies at any time.Allocated Bandwidth vs Minimum Bandwidth
"Allocating" bandwidth is a meaningless concept unless there is a finite pool from which to allocate from. If a rule with a minimum bandwidth allocation is a member of a Group, the bandwidth must be "allocated" from the Group's bandwidth pool, in order to guarantee that other members can't use it. A rule that is not a member of a group will have its bandwidth allocated from the pool of bandwidth available to the Interface. The Group or Interface is said to be the rule's "Container", because it defines the amount of bandwidth available to all of the "members" within its scope. If there is no bandwidth allotment for the rule's Container, then the bandwidth can not be "Guaranteed", because there is no reference to the amount of bandwidth available. In this case, the "guaranteed" bandwidth is simply a minimum bandwidth setting.Auto-Shaping
The ET/BWMGR includes an "auto-shaping" feature designed to automatically manage network congestion without any "rules" whatsoever. Auto-shaping can be used alone or in co-ordination with any other settings.To enable auto-shaping, simply set -autothresh on an interface (typically, the outside interface):
# bwmgr igb0 -ifac -autothresh_in 5800000 -autothresh_out 5800000Typically you would set this to just below your upstream capacity. So if you have 6Mb/s of upstream bandwidth, set the threshold to 5800000. Whenever your network traffic is over the threshold, the auto-shaping mechanism will "kick in" and begin slowing all of the traffic on the network in a very "fair" manner.Note that auto-shaping is a pacing mechanism only, and will not apply any hard limit or delay any traffic other than by natural means (such as the TCP window). So your bandwidth will likely exceed the threshold, but your congestion (ie backup traffic, queue depths, etc) will be much less.
Setting Hard Limits - Allocating Shared Bandwidth with a Rule
The simplest type of bandwidth management rule is the hard limit. Hard limits set a ceiling on the amount of data that a host or type of traffic can use, and will regulate it at the ceiling when operating over the limit. This effectively simulates any data rate you choose regardless of the medium. Limits can be set for incoming or outgoing traffic, or for incoming and outgoing combined.# bwmgr igb0 -x 500 -addr 100.1.1.1 -bwin 56000 -bwout 128000This command sets a bandwidth limit of 56000bps for incoming traffic and 128000bps for outgoing traffic. "Incoming" traffic is defined as by viewing direction as relative to the "Outside" bridge interface. Typically, all rules are added to the Outside interface, which is also set as the Default interface, so when you log in to the GUI, you will see the rules on the correct interface.To set a combined setting, use -bwboth as follows:
# bwmgr igb0 -x 500 -addr 100.1.1.1 -bwboth 64000This setting will allow the total of incoming + outgoing traffic to be no more than 64000bps.Minimum Bandwidth Allocation
"Allocating" bandwidth can be achieved by setting a bandwidth minimum, which defines the minimum data rate that a host or traffic type can use before any action will be taken on the data stream. When the rules container (Group rule or Interface) has a bandwidth setting, this setting will represent "guaranteed" bandwidth. Without an interface or Group bandwidth setting, this value represents bandwidth that will be considered high priority.Suppose you have VoIP running on udp port 15100. This setting will set the minimum bandwidth to 64kbs for the port, giving it the highest priority until the minimum is exceeded.
# bwmgr igb0 -ipprot udp -port 15100 -bwmin 64000To see this in context, these two rules use a -bwmin value to allocate a bandwidth guarantee of 64kb/s out of the 1.54Mb/s allocated to the interface.# bwmgr igb0 -ifac -bwin 1544000 -bwout 1544000# bwmgr igb0 -ipprot udp -port 15100 -bwmin 64000You can combine all of the bandwidth settings in a single rule. Note that -bwmin and -bwburst (discussed below) inherit the "combined" attribute if -bwboth is specified. So, for example, if -bwboth is specified, then -bwmin and -bwburst apply to the combined (incoming + outgoing) total, if -bwboth is not set, then itt is applied for each direction.TCP Rate Limiting
TCP rate limiting is a powerful bandwidth management technique that reduces the amount of traffic in your network and potentially slows each TCP session by reducing the TCP receive window. While some products on the market use rate limiting as their primary bandwidth management mechanism, there are undesireable results when windows are dropped too low, as overhead on your network in terms of the number of packets and bandwidth usage can significantly increase. Because of this, the ET/BWMGR uses rate limiting as one of several mechanisms to manage your network without having an adverse effect on overall traffic volumes.Disabling Window Shaping
Window shaping can slow a connection too much if the delay for the connection is high, causing a stop and wait situation. Typically, ACKs are sent well before a full window can be transmitted, so traffic simply slows down. When shortening the window causes a big delay in receiving the ACK, the per-connection throughput can be slower that intended. In this case, you can disable shaping for a rule, which can alleviate the problem.# bwmgr em0 -name SlowUser -bwin 512000 -bwout 512000 -no_shapingPer Session Bandwidth Management - Rate Limiting
TCP rate limiting effectively is a "per session" method of controlling traffic. Each TCP session within a container is automatically controlled. When you set a bandwidth limit, the default behavior of the software is to use an internal "adaptive window". The adaptive window algorithm attempts to reduce the window based on the traffic flows, setting it just where the traffic flows at the rate specified without excessive backup. The adaptive window will never be set lower than 1 full packet (1500 bytes), so it will not increase the overhead on your network as some rate limiting products do.You can effectively "shape" traffic without limiting it by creating a container with a bandwidth setting that is just below your available bandwidth. So for example, if you have 3Mb/s of bandwidth, you could rate shape all traffic with :
# bwmgr em0 -ipprot tcp -bwlink GroupA -bwin 3000000 -bwout 3000000While this may seem trivial, it in fact is quite powerful. The rule will match all tcp traffic and limit it to 3Mb/s. But the effect of the adaptive window management is to slow each session equally to create overall fairness within the usage of the bandwidth limit. It will also maintain minimum flows, reduce the likelihood that a drop will occur, and create a scenario with minimum delay for tcp traffic.Of course window shaping only works on TCP traffic so you'll need other rules to control other traffic. But this illustrates how you can substantially improve your network flows with a minimum of controls.
Packets Per Second Bandwidth Rules
Packet per second rules can also be used to control users. PPS rules create a loosely-defined bandwidth limit which adjusts for the possibility that many small packets can use up resources even at low bandwidth levels. Give that a maximum packet is (usually) 1500 bytes and a minimum is usually 60 bytes, you can use a pps rule to give a wide range of capability to an end user or application without giving them unlimited bandwidth. So the following:# bwmgr igb2 -x 4000 -name AcmeCorp -addr 192.168.17.1 -ppsin 300 -ppsout 300would limit the throughout of the specified address to 300 packets/second. This translates to a bandwidth limit of between 144000bps and 2.4Mb/s depending on the average packet size of their transactions. Note that there is no burst setting for packets per second rules.Combining Global Rules for Bandwidth Management
Using global rules, you can set multiple control criteria for traffic that matches multiple rules.# bwmgr igb2 -x 1000 -addr 10.1.1.0 -addrmsk 255.255.255.0 -bwin 1000000 -bwout 1000000 -global# bwmgr igb2 -x 1200 -addr 10.1.1.17 -bwprofile defaultThe above allows you to set a limit for a class C without having to create a group. Since rule 1000 is a global rule, it will be enforced in addition to rule 1200 for traffic matching 10.1.1.17Combined BW and PPS rules
Rules can have both bandwidth and PPS settings. This allows you to create a single rule that can control by both bandwidth volume and activity level.# bwmgr em1 -x 500 -addr 10.1.1.1 -ppsin 100 -ppsout 100 -bwin 512000 -bwout 512000The above rule would limit address 10.1.1.1 to the EITHER 100pps or 512000bps. If all packets are 1500 bytes, a setting of 100pps could allow as much as 1.2Mb/s of bandwidth, which may be more than you want. So adding the bandwidth setting will ALSO cap the rule at 512000. This rule allows both criteria to be estabished in a single rule. With 60 byte packets 100pps allows for only 48Kb/s.Using Bandwidth Profiles
Bandwidth profiles are templates that allow you to apply common settings to any number of rules.What is a Profile?
Each "profile" has a unique identifier, along with a series of options that will be applied to any rules that use the profile.The profile depicted above defines a simple profile which has incoming and outgoing bandwidth limits of 512,000 bps.
The advantage of a profile is that you can change many rules at once by changing the profile. If you decide to change the default bandwidth to 600,000bps, you can just change the profile, and it will be applied immediately to all rules which use the profile.
Defining Bandwidth Profiles
Profiles are defined from within the HTML GUI, and stored in a database.Applying Bandwidth Profiles
To apply a profile to a rule, use the -bwprofile rule option.bwmgr em0 -x 1000 -addr 192.168.17.11 -bwprofile defaultThe above would apply the settings of the current "default" profile to the rule, as if you had entered them individually. Note: In the CLI, do NOT specify any bandwidth settings in the same command with -bwprofile or you may get the wrong results. In the HTML interface, other settings are ignored when a profile is specified.The Effect of Using Bandwidth Profiles
At first glance, bandwidth profiles might just appear to be a shortcut for entering rules. But they are much more than that. Profiles are a vehicle for managing large rule sets, and also for implementing large-scale SLAs (service level agreements) or bandwidth tiers. Firstly, profiles are not only applied when you create the rule. If you change a profile, ALL of the rules which reference the modified profile will be changed accordingly. So if you have hundreds of customers/users who are using the "default" profile, you can modify global behavior of all of them that reference a specific profile in a single operation.Profile Transitions
Previous to version 5.0, the ET/BWMGR used profile transitions to change profiles depending on the time of day. In v5, a more flexible mechanism is used, where multiple time changes can be applied by using Time Profiles. Time Profiles are described in a separate document.Implementing Tiered SLAs with ET/BWMGR profiles
A simple example of a tiered SLA (service level agreement) would involve defining profiles for various service levels, and then applying them to customers/users who subscribe to that level of service.Using the above simple settings, you have 4 distinct levels of service that simplify the adding new customers.
# bwmgr em0 -name cust_a -addr 192.168.17.1 -bwprofile default# bwmgr em0 -name cust_b -addr 192.168.17.2 -bwprofile default# bwmgr em0 -name cust_c -addr 192.168.17.3 -bwprofile silver# bwmgr em0 -name cust_d -addr 192.168.17.123 -bwprofile goldReverse Rules
"Reverse rules" are basically dynamic "Groups" that are created automatically by selection of a "trigger" rule. Not to be confused with burst triggers; the trigger here is a rule which causes another rule to be created. The trigger can be any criteria, but is most usually a single packet which signals that a stream which needs to be controlled is being created. For example, suppose you wanted to limit "each host that accesses Server A" to 256kbs. You could use a reverse rule which triggers on a tcp connect to Server A which would create a limit on that host (and optionally, the port). Once this trigger is detected, you then know that a transfer is occuring on a specific address/port combination and a dynamic control could be put in place automatically.Another example is a WWW server, where you may want to limit hosts accessing the site on a per session basis; that is to limit individual sessions to an address independently, either with a ceiling, a floor or on a shared, equal basis. This allows you so set up a rule which will limit EACH USER accessing a site to either a specific bandwidth or a percentage of the bandwidth dependent on how many users are currently accessing the site. Actually, reverse rules are better than limiting each session. Other products limit each TCP session to a host, but a host many open many simultaneous sessions (such as browsers typically do for graphics and text), so you cannot precisely limit a "session" because you don't know how many sessions exist. Many FTP clients will open multiple sessions to increase throughput, which defeats the "per session" limiting mechanisms. By limiting the source IP address, you are limiting the remote user no matter how many sessions are open.
Suppose you had a site with a video feed, and you wish to limit each user to 80K to avoid one user hogging all of your backbone bandwidth. You're not concerned with an upper limit for the entire site, you just don't want any single user to get more than 80K. You could use a reverse limit to achieve this very easily.
# bwmgr em0 -name VideoPlanet -daddr 211.14.1.7 -r -bwin 80000 -bwout 80000When a "reverse rule" is accessed (specified with the -r switch as shown above), the bandwidth management software will attempt to "spawn" a new rule in an available rule slot directly before the reverse rule. For example, if the name address rule index is 5000, the first dynamically learned rule would be inserted at 4999, then 4998 and so forth. If a slot is occupied by another, non-associated rule, then the new rule can not be created. This implies that you must leave rule space before the reverse rule in order for the rule to be created. If no slots are available, the rule index plus 1 (NOT the next rule, it MUST be 1 index higher than the target rule) will be enforced. For example:bwmgr -x 4800 -addr 10.11.1.1
bwmgr -x 5000 -name reverse_test -daddr 211.14.1.7 -r -bwboth 56000
bwmgr -x 5001 -daddr 211.14.1.7 -bwboth 56000The above allows for 199 dynamic entries between 5000 and 4800. Once all of the slots are filled, no more new rules will be created. With the above settings, if more than 199 users were connected to the site at one time, all additional users (for which new rules could not be created), would be limited to a total of 56000 (as rule 5001 would then be enforced). This implies that the 200th user is actually the sum of all of the users over 199. Note that rule 5001 above is also a regular rule, so make certain to give it match criteria, typically the same as the target reverse rule without the reverse specifier.
Note that reverse rules must be named. Reverse rules create pseudo-groups, so the link to the head entry needs to have a name associated to create the proper linkage.
By default, reverse rules only limit the source address of the host accessing the trigger. So with the above rule, if host 192.168.0.1 accessed the server at 211.14.1.7, the following dynamic rule would be created:
bwmgr -x 4999 -addr 192.168.0.1 -t -bwboth 56000If you don't want the entire IP limited, you could specify -usesport or -usedport indicate that the source or destination port should be used. -usesport indicated that the source port should be used, while -usdport specifies the destaination port.# bwmgr -x 5000 -name reverse_test -daddr 211.14.1.7 -usersport -r -bwboth 56000The above rule tells the ET/BWMGR to also use the source port when creating the dynamic rule. So now if 192.168.0.1 accesses the server, the following might be created:# bwmgr -x 4999 -addr 192.168.0.1 -port 41003 -t -bwboth 56000The negative of using the port also is that typically, a browser will open up multiple sessions when accessing a web site, so for each access you may see 3 or more rules created. This increases system overhead (as the dynamic rules have to be created and deleted, and you will have more overally rules in the ruleset), and further limits the number of "actual" users you can limit. If you have 1000 slots available, for example, perhaps only 300 actual users will be limited.To control which address is used, there are several controls available. As noted before, the default is to use the source IP address.
-usesaddr Use the Source IP Address
-usedaddr Use the Destination Address-usesport Use the Source Port-usedport Use the Destination Port-useprot Use the Protocol-r Reverse IP Address Rule-rm Reverse MAC RuleThe -r or -rm controls whether the MAC or IP is used, and the -use?addr controls whether to use the source or destination IP address, and the -use?port control whether or not the port should be included. -useprot is useful for creating reverse rules for pseudo-protocols such as p2p.
#
bwmgr em0 -x 3000 -ipprot p2p -bwin 64000 -bwout 64000 -usesaddr -useprotBe careful when using MAC rules that you understand what your traffic looks like, and that you don't block or limit your gateway if thats not your intention.
A consideration with reverse rules is what happens when a dynamic rule cannot be created. The most common reason being that there are no more slots available, or -maxlinks has been reached. When a dynamic rule cannot be created, the packet not acted upon.
Reverse Rule Modifiers
There are several new settings associated primarily with reverse limiting. The first allows finer control of how many users can access a site. This is independent of the discussion above. If you wanted to limit a site to 50 accesses, you could use the following:bwmgr -x 4800 -addr 10.11.1.1
bwmgr -x 5000 -name reverse_test -addr 211.14.1.7 -r -bwboth 56000 -maxlinks 50So even though there are 199 slots available before rule 5000, only 50 dynamic rules will be allowed to be created.
A second concept is the duration in which a dynamically created rule will remain active. You don't want rules to continue to be in the table long after a user has gone away. The default is 5 minutes of inactivity before the dynamically created rule will be deleted. Using the -ruletmo switch, you can specify a timeout for each rule. For example
bwmgr em0 -name reverse_test -addr 207.11.14.1 -bwboth 56000 -r -ruletmo 30The above specifies a timeout of 30 seconds, which may be more appropriate is using ports with a web server (since each page access generally uses a new port).The normal "timeout" for a rule is an idle timeout. This means that when no matches occur for x seconds, the rule will be removed, where x is the timeout. Of course in a situation where there is continuous traffic, the rule may never timeout. If that is a problem, you can use -fixedtmo instead of -ruletmo. The -fixedtmo setting will cause the rule to be removed x seconds after it is created. For single trigger events (such as access to a port that is later redirected), this may not work properly, as the "event" may not occur again while the session may continue.
Creating Dynamic Groups with Reverse Rules
You can use the dynamic nature of reverse rules to create "dynamic groups". Once you understand what the default behavior of a Reverse Rule is, you will have the context to understand the flexibility that comes from changing those defaults.Every reverse rule must have a name, since the rule acts as a group. By default, rules spawned by a reverse rule are added to the reverse rule's group, with automatically generated names.
If a reverse rule is a member of a group, then any dynamic rules created from the reverse trigger will also be a member of that group.
For example, suppose you had a class C and you wanted to limit each address to a specific setting. You'd have to create a group, and create 254 rules in the group, which can be tedious. Instead, you could do this:
# bwmgr em1 -x 3000 -name MyGroup -bwin 1000000 -bwout 1000000 -group# bwmgr em1 -x 3001 -name MyGroup_rev -addr 11.1.1.0 -addrmsk 255.255.255.0 -r -bwin 64000 -bwout 64000 -bwlink MyGroupThe above defines a group at index 3000 that is limited to 1Mb/s. Rule 3001 defines a reverse rule, which is a member of the group MyGroup. Because the reverse rule is a member of the group MyGroup, the dynamic rules will be created before index 3000 (NOT the index of the reverse rule in this case), and they will inherit the group membership of the trigger rule, which means that they will be added to the group MyGroup, with the bandwidth settings from MyGroup. This simple construct allows up to 254 dynamic rules (each possible address in the 11.1.1.0 network) with a single rule.Host Name Reverse Rules
As described earlier, the -nameaddr option can be used to Match virtual hosts even though many hosts may use the same IP address. There is a particular problem with virtual hosts which is that only the initial HTTP header contains the virtual host information. Subsequent packets look like regular http traffic going to an IP address shared with many hosts. In order to simplify the management of virtual host traffic, -nameaddr rules are simply specified as reverse triggers for dynamic reverse rules. The -nameaddr rule is used as a trigger to create dynamic rules to hosts accessing the virtual host.# bwmgr em0 -name thishost -nameaddr www.thishost.com -r -bwboth 128000The above specifies that each IP address accessing host www.thishost.com will be limited to a 128000bps. The -nameaddr tag will be triggered when an http request with the proper host header info is detected, at which point a temporary, dynamic rule will be spawned limiting the requester, which will inherit the properties of the trigger rule. The -ruletmo and -maxlinks switches may also be used to control name address rules.Optionally, Groups or the -b option may be used in conjunction with -nameaddr to change the behavior of the creation of the reverse rules. With the -b option set, the bandwidth value of the trigger rule would be a ceiling reference, and the dynamic rules will be balanced in the same way as standard reverse balanced rules.
# bwmgr em0 -name thishost -nameaddr www.thishost.com -r -bwboth 128000will cause all of the hosts accessing www.thishost.com to be limited to 128000bbs each, while# bwmgr em0 -name thishost -nameaddr www.thishost.com -r -b -bwmin 32000 -bwboth 128000will result in each host accessing www.thishost.com to have an equal share of 128000bps with no less than 32000bps.Reverse Firewall Rules
The ET/BWMGR allows you to define rules which can be set up to signal that some remote host should be blocked from access to your network. Port scanners are an example, as are address probers (applications that attempt to discover hosts and services on your network). By using what we call "reverse firewall rules", you can set up triggers which cause hosts to be blocked for some predetermined length of time when they access a port or address or a specific service on a specific host.Reverse firewall rules could also be called "reverse discard" rules, because thats what they do. You set up a trigger rule, and when the rule Matches, a dynamic firewall rule is set up that blocks the source address from any further access to your network. For example, recall a virus that caused hosts to sent a specific URL that could infect specific types of servers. The virus caused servers to scan addresses and send a "default.ida" URL, hoping to find hosts to infect. You could easily thwart this with the following:
# bwmgr em0 -x 1000 -url default.ida -fw -r -priority discardThe above rule would look for http traffic with a URL of "default.ida". When a Match was encountered, a reverse rule would be created (starting at index 999 and moving down) with the source address of the frame (ie the "sender" of the specified URL) and a priority of FW-Deny (or discard). Any subsequent traffic from that host would be blocked.To stop an address scanner, select an address on your network that isnt in use (or is only used internally). The theory is that anyone accessing such an address is bad.
# bwmgr em0 -x 1000 -addr 209.14.1.1 -r -fw -ruletmo 300 -l -priority discardthis rule would block anyone who attempted to access 209.14.1.1 for 5 minutes. Note that -l is set, so that each access will also be logged.To thwart a port scanner, you could select a taboo port or range of ports that shouldn't be accessed by outside hosts. pop3 is a popular port scan port:
# bwmgr em0 -x 2000 -ipproto tcp -port pop3 -r -fw -priority discardThis rule would cause anyone accessing a pop3 port to be blocked. When using such rule, remember to insert rules before the triggers that specifically allow hosts that are permitted to access the addresses or port, otherwise you will block them also.Temporary Rules
You can add a temporary rule using the -t option (for adding a temp rule) and either the -fixedtmo or -ruletmo option.Using these options together, you create a rule that will be deleted after some specified number of seconds.
# bwmgr em0 -x 50000 -t -fixedtmo 300 -addr 10.1.1.1 -bwin 128000 -bwout 128000The above rule will limit address 10.1.1.1 to 128000 in and out for 5 minutes. After 5 minutes the rule will be deleted. If you wanted to make it an idle timeout (ie the rule would be deleted after 5 minutes of no activity), use -ruletmo instead of -fixedtmo.Group Bandwidth Management
"Groups" allow you to create rules which act on a number of rules with some common parameters. Groups (and also interfaces) can also be referred to generically as "containers". Groups are created by adding a rule with the option -group, which indicates that the rule is a head entry for a group. The -name option is required to define a group. Group containers exist only to hold other objects (including rules and other groups - nested groups are allowed), and as such they should not have any matching criteria. Group containers can have specific bandwidth settings, or profiles attached.# bwmgr em0 -name renegades -groupTo add members to the group renegades, use the -bwlink option:# bwmgr em0 -addr 10.1.1.1 -bwlink renegadesThe above rule creates a new rule and links it to the group renegades. Of course, a group with no properties, as in the example above, isn't very interesting or useful. By adding properties to the rule, you can create powerful super rules that can increase your flexibility to manage bandwidth.Setting a Bandwidth Ceiling for a Group
The simplest form of a group rule is the bandwidth limit for a group. This allows you to set a common bandwidth limit that applies to all of the members of the group as if it were a single rule. For example:# bwmgr em0 -name Group0 -bwboth 256000 -group# bwmgr em0 -addr 10.1.1.0 -addrmsk 255.255.255.0 -bwlink Group0# bwmgr em0 -addr 12.1.7.14 -bwlink Group0# bwmgr em0 -addr 12.1.7.15 -bwlink Group0The above ruleset will set a bandwidth limit of 256000 bps which will be shared by the 10.1.1 network, plus 2 hosts on the 12.1.7 network. Grouping allows you to aggregate any number of disjoint hosts, network or traffic types and bundle them as if they were one rule. One benefit of this is that they can each have their own statistics, if required. You can also apply other bandwidth properties which will apply to groups as a whole such as -bwmin, -bwin, -bwout and -bwburst_in/out.Setting Bandwidth Limits Within Groups
You can give rules within a group its own properties which will work in concert with the group properties. For example, in the above example, suppose you didn't want any member of the group to use more than 128K of the bandwidth at any time (the default would allow it to use up to the full 256K if none of the other members were active. You could do the following:# bwmgr em0 -name Group0 -bwboth 256000 -group# bwmgr em0 -addr 10.1.1.0 -addrmsk 255.255.255.0 -bwboth 128000 -bwlink Group0# bwmgr em0 -addr 12.1.7.14 -bwboth 128000 -bwlink Group0# bwmgr em0 -addr 12.1.7.15 -bwboth 128000 -bwlink Group0The above would allow up to 128000bps for each member, but limit the group to 256000bps as a whole.Balanced Group Bandwidth
You may want to achieve "fairness" in a group, so that each member will get an equal chunk of bandwidth depending on how many members are active at any time. By using the -b option, you can "balance" the bandwidth across active members in a group. So, for example, if you had a group with 30 members and a bandwidth allotment of 512000, if 2 of them were active they would get 256000 each and if 10 were active they would get 51200 each. You can additionally use the -bwmin to assure the the allocation per user was at least a certain amount (because if all 30 were on each member would have an allocation so low that none of them would be functional). Using the example above again, you could simply set the -b option in the group rule to achieve balancing:# bwmgr em0 -name Group0 -bwboth 256000 -b# bwmgr em0 -addr 10.1.1.0 -addrmsk 255.255.255.0 -bwlink Group0# bwmgr em0 -addr 12.1.7.14 -bwlink Group0# bwmgr em0 -addr 12.1.7.15 -bwlink Group0Simply by adding the -b option, you transform the group into a balanced bandwidth group. When you view the rules, the current setting (based on how many of the rules are currently in use) will be shown. Note that it may not be safe to set the -b option to an existing group that has active members, as some required settings in group members may not be initialized properly.Nested Groups (Groups within Groups)
You can define a group within a group, that is a group tag which is a member of another group. This allows you to use a group as if it were a single rule within a group, or allow a group bandwidth setting to be dependent on the activity or settings within another group. You can even have balanced groups withing balanced groups, allowing for full dynamic bandwidth settings on a demand basis.# bwmgr em1 -x 1000 -name BigGroup -bwin 1000000 -bwout 1000000 -group -b# bwmgr em1 -x 1010 -addr 10.1.1.1 -bwlink BigGroup# bwmgr em1 -x 1500 -name LittleGroup -bwlink BigGroup -b# bwmgr em1 -x 1510 -addr 11.1.1.1 -bwlink LittleGroup# bwmgr em1 -x 1510 -addr 15.1.1.3 -bwlink LittleGroupThe above creates a balanced group with a bandwidth limit of 1Mb/s in and 1Mb/s out. There are 2 members in the group, IP address 10.1.1.1 and LittleGroup, which has 2 of its own members. The bandwidth of BigGroup will be distributed equally between IP address 10.1.1.1 and LittleGroup as needed, as if LittleGroup was a single rule. Within LittleGroup, the bandwidth will be further distributed to its members.Excluding Traffic (Pass-thru Rules)
You may wish to completely exclude certain traffic from group or interface statistics and limits, such as the traffic from certain servers. You can exclude traffic by setting a rule with a priority of "pass-thru" which allows traffic to pass and not be counted towards limits.# bwmgr em0 -ifac -bwin 1000000 -bwout 1000000# bwmgr em0 -x 1 -saddr 10.1.1.0 -saddrmsk 255.255.255.0 -daddr 45.1.1.1 -priority pass-thru# bwmgr em0 -x 2 -saddr 45.1.1.1 -daddr 10.1.1.0 -daddrmsk 255.255.255.0 -priority pass-thruThe above will allow only 1Mb/s of traffic through em0, but will not count traffic between host 45.1.1.1 and the 10.1.1.0 class C network. The pass-thru designation excluded the traffic from being counted towards limits in interfaces or groups in which the rule is a member.Prioritization
The fastest way to move data is to transmit it as soon as you can. But since only one frame can be transmitted at a time onto a medium, data becomes "queued" up and important data may have to wait until less important data is finished. By "prioritizing" the data, you can reorder the data so that important data is sent first. While this may all seem to be what you want, there are caveats as well. The big issue with prioritizing data is that there is a time penalty to pay for every frame that is prioritized, because you have to hold some amount of data so that you can reorder it according the prescribed priorities. When traffic is not so heavy (that is, when you would be perfectly happy with the throughput if no prioritization is done), then you are introducing unnecessary latency into ALL of your traffic. This is something that you want to avoid.ET/BWMGR Prioritization
The ET/BWMGR uses an internal algorithm to determine when queued traffic is to be forwarded. Priorities have 2 functions; first, higher priority traffic is sent first where there is traffic with multiple priorities sitting in a delay queue. So when both high and low priority traffic is delayed, high priority traffic will be processed first. Lower priority traffic is also more likely to be dropped. Priority 1 traffic is very likely to be dropped if it is delayed. Priority 10 traffic will probably not be dropped.The effect of this is that if traffic isn't being delayed, then priorities have no meaning. Non-delayed traffic is simply sent when it is received.
How to Set Global Data Priorities
The ET/BWMGR has 10 levels of priority (1-10), with 1 being the lowest priority and 10 being the hightest. When data is set to be prioritized, the priority subsystem tries to find a Match in the ruleset. If a Match occurs, then the priority of the data is set to the priority indicated in the Match.The rule for setting a priority is simple. The first non-normal priority that matches the traffic is the priority of the traffic, even if a later, more specific rule also has a priority setting.
# bwmgr em0 -global -x 100 -ipprot icmp -priority 1# bwmgr em0 -global -x 110 -ipprot icmp -addr 10.1.1.1 -priority 6# bwmgr em0 -x 120 -addr 10.1.1.1 -bwprofile defaultAn ICMP packet from 10.1.1.1 would be set to a priority of 1 in the above ruleset, even though it appears that rule 100 is "more" of a match. A match is a match. Since rule 120 doesn't have any priority set, the first global rule is used. If you wanted rule 110 to hit, you should give it a lower index then rule 100. Alternatively:# bwmgr em0 -x 100 -ipprot icmp -priority 1 -global# bwmgr em0 -x 120 -addr 10.1.1.1 -bwprofile default -priority 8for the above, ICMP traffic for 10.1.1.1 would be set to a priority of 1 as per rule 100, and set to 8 for all other traffic. Additionally:# bwmgr em0 -x 100 -addr 10.1.1.1 -bwprofile default -priority 8# bwmgr em0 -x 110 -ipprot icmp -priority 1 -globalThe above ruleset would set an ICMP packet for 10.1.1.1 to have a priority of 8, while other ICMP traffic (for rules with indexes greater than 110) would be set to 1.Setting Priorities for Bandwidth Rules
All bandwidth rules include are assigned a priority, with the default being NORMAL, or 5. You can optionally set a different priority with the -priority command line option. If a data frame Matches a bandwidth rule, the priority of the data will be temporarily set to that value. If the priority threshold of the interface or the bandwidth limit of the rule has been exceeded, the data will be checked against the Global Priority Ruleset for a Match. If a Match occurs, then the priority of the data will be set to the priortity indication in the Global Priority rule.Statistics
Showing "Hits" and "Drops"Any time that a rule Matches or "hits", a counter is incremented. To view a specific rule on the console, use the "show" command:# bwmgr em0 show 200200 IO Rule200 10.1.1.1 / 32 14,175/35where the 200 is the index or rule number and the numbers at the end represent the hits/drops number of times a packet that matched this criteria was Matched, and also the number of times that this rule resulted in a dropped data frame. You can also use get rule, to show all info about the rule.
Saving Stats for a Rule
Saving statistics is generally a function that is integrated with the Graphical Interface, but an overview of how it works will help you to debug problems and also do things manually if you have the need to do so.There are two command line options which cause statistics for a particular rule to be stored with the bandwidth manager subsystem. The first option, -stats, is a flag that tells the bandwidth manager to store stats for this rule.
# bwmgr em0 -x 7000 -addr 10.1.1.1 -statsStats are best viewed using the GUI.About the bwmgrd daemon
bwmgrd is a php program that runs every 5 minutes, gathering and storing stats. It uses the "stats" table in the database to get a list of stats-enabled rules. For each entry in the stats table, it updates the associated RRD file.RRD files are stored in /usr/local/etc/bwmgr/graphs. If the rule name is AcmeCorp, the file name will be AcmeCorp.rrd. RRD files can also be used by other graph utilities (such as Cacti) that can parse RRD files.Global Stats Rules
Note that when a normal rule "hits", no more rules are checked. This is done for efficiency and also as a matter of basic policy. Unfortunately, for statistical purposes it may hinder your ability to gather statistics because traffic types overlap.For example, if you wanted to gather stats for the total www traffic on your network and also the www traffic to a particular host, to following would fail:
# bwmgr em0 -x 100 -name A -addr 207.11.14.1 -prot tcp -port www -stats# bwmgr em0 -x 200 -name B -prot tcp -prot www -statsThe reason it would fail to give the results you want is because any traffic for host 207.11.14.1 would not be included in the numbers gathered by rule 200 because once rule 100 hits, no other rules could hit with a higher index.To override this, you can use a global rule with a stats setting.
# bwmgr em0 -x 100 -name tcp_all -prot tcp -stats -global# bwmgr em0 -x 200 -name www_all -prot tcp -port www -stats -global# bwmgr em0 -x 300 -name AWC -addr 207.11.14.1 -stats -global# bwmgr em0 -x 5000 -addr 207.11.14.1 -bwboth 250000The above allows you to limit all of the traffic to host 207.11.14.1 to 250000bps and also gather statistics on specific traffic types, even if the types overlap with other rules. The -stats switch would allow you to store and graph each type above.Note that stats rules still must have a lower index than any non-global rules. In the above example, any global rule with an index higher than 5000 would not be counted for host 207.11.14.1. As a simple policy, you should segregate your global and bandwidth rules by setting an index below which all rules are non-global to avoid conflicts.
Changing the Statistical Period
You can change the statistical period with the stats_period option.To set the period to 1 minute, you would use the following:
# bwmgr set stats_period 60Note that the statistical period is the same as the burst period, so if you are using bursting its likely that its more important to use a period to conform to your bursting requirements than statistical viewing.Advanced Topics
Setting the GUI password
In the event that you forget the password or have to rebuild your database, you can easily set a new password for the ET/BWMGR GUI from the command line.# bwmgr guipassword PASSWORDChanging the Webmin Password
Webmin is the system administration GUI that runs on port 10000. If you lose access or can't remember the password, you can change it from the CLI.# cd /usr/local/webmin
# perl changepass.pl /etc/webmin admin passwordThis will change the "admin" user's password to password. If you are trying to change the password for a different ET/ADMIN user, simply replace "admin" with the correct username.
Controlling File Sharing Programs - Gnutella, Kazaa, Audiogalaxy, Morpheus and iMesh
A special filter is available for detecting these file sharing protocols. While most file sharing protocols do act on specific ports, the way that they work requires some special intelligence to detect, which we have built-in the the ET/BWMGR software. The ET/BWMGR software can detect when these protocols are being run on non-standard ports, allowing you to control the traffic without having to manually sniff out the connections.Controlling p2p Protocols - The p2p protocol Group
An internal special protocol, p2p, is defined which will match many different types of p2p protocol. You can enhance these settings by defining newly discovered agent or urls in the /etc/bmgr-protocols file.To control all known P2P traffic with a single rule:
# bwmgr em1 -ipprot p2p -bwin 128000 -bwout 128000The above rule is all thats required to control all of the p2p protocols, no matter how many streams there are. You can also use the p2p protocol definition along with other settings, just like any other protocol:# bwmgr em1 -name groupA -group -bwin 256000 -bwout 256000# bwmgr em1 -addr 10.1.1.1 -ipprot p2p -bwin 64000 -bwout 64000 -bwlink groupA# bwmgr em1 -addr 10.1.1.1 -bwlink groupAThe above settings would limit 10.1.1.1 to 256000bps and limit the p2p bandwidth to 64000bps out of the 256000.Gnutella, Kazaa and DC
Special protocols for Gnutella, Kazaa and DirectConnect (DC++) are available in case you want to see counters or stats for these, or in the oddball case where you want to have different settings for one or the other. The protocol "p2p" is a "group", so that it matches gnutella, kazaa, DC++ and all other supported p2p protocols. Sometimes there may be some gnutella or kazaa connections that are classified as P2P or incorrectly (for example if you run kazaa on the gnutella port it will be shown as gnutella), so p2p is safer if controlling p2p is an important function.General Maintenance
Deleting a Bandwidth Rule
To delete a bandwidth rule, use the delrule keyword with the interface and index or name of the entry you want to delete.To delete an entry displayed with index 200:
# bwmgr em0 delrule 200If the entry is named, then you can use the name:#
bwmgr em0 delete cust0To delete a firewall entry, use delfw instead of delrule. To delete a global priority rule, use delpri.
Saving The Rules
You'll want your current rules to be restored when you reboot your system. If you want your rules to be saved automatically, there is a setting called Auto Rebuild in the Settings tab in the ET/BWMGR GUI that must be enabled.If Auto Rebuild is on, then any changes made to the ruleset are saved the next time that bwmgrd is run, which is every 5 minutes by default.
Rules are saved in the shell script /etc/rc.bwmgr, which is run at boot time.
If you have Auto Rebuild turned off, then you will have to manually save your rules. The rebuild will output the current ruleset.
To save the ruleset in a file, simply redirect the output of rebuild to a file. In this, we use the default of /etc/rc.bwmgr, so that the rules will be restored at next boot.
# bwmgr rebuild >/etc/rc.bwmgrYou can manually check the file /etc/rc.bwmgr to make sure your rules are being saved. After entering a large number of rules it's a good idea to check them manually before you reboot or have a crash.If you're using the Auto Rebuild setting, you can check the bwmgrd log to confirm that is ran the rebuild:
#tail -f /var/log/bwmgrd.log

02-21-2025 08:25:00 - Running bwmgrd
02-21-2025 08:30:00 - Running bwmgrd
02-21-2025 08:30:00 - Rebuilding Rules
Other ways to rebuild:
# bwmgr rebuild > /etc/rc.bwmgrRules are read from the running system and a new startup file is output to the screen. You can do this without the redirection if you just want to check the rules without saving to a file; or you can save it to a different file for review.Other Topics
Performance Tips
Specifications, as with any networking product, are variable based on the actual usage of the machine. When we specify that a particular appliance can handle a given amount of traffic, for example, 1Gb/s, this means that this is the maximum it can reasonably handle with minimal settings. An example of minimal settings isn't so much the number of rules, but which features are enabled. The more features in use, and the more complex the typical rule, the more CPU power is needed, which can diminish peak capacity.This section exists to document the settings that require more processing power than others, so that you can tune a system that is overloaded, or adjust the "capacities" according to your needs.
Rule Overhead
Certain types of rules add more overhead than others, and the existence of even a single rule with some features will create system overhead, because additional filters will be required for every frame.Firewall Rules
Firewall rules are not indexed; they must be scanned sequentially. So having a lot of firewall rules on a loaded system is not a good idea. If you have a lot more CPU power than you need in your system, you can use the flexibility of the firewall features without having to worry. But if you have a loaded system with high traffic levels or a lot of rules, you should consider a separate box as your main firewall, and just use the integrated firewall to control access to the system itself. Also, If you have firewall rules for full IP addresses, its more efficient to place them in the bandwidth rules section so they will be indexed. Note that only the first rule can be a FW-deny in the bandwidth section.MAC address Rules:
If you have even 1 rule on an interface that has a MAC address as a matching criteria, a significant increase in resources will be required as the MAC addresses of every single frame that passes through the interface will have to be examined. By default, no MAC checking is done (as a performance enhancement). If you need to use MAC matching there is no problem in doing so, but if you just have 1 or 2 rules and don't really need them you can reduce overhead by eliminating them.Multiple Interface Usage:
If there are no settings on an interface, frames will not be decoded and/or examined. If you have 1 setting on an interface, then every frame will have to be classified. If possible put all of your rules on one interface. Also be very careful not to affect the same data on 2 different interfaces. The timings required for proper delay and control of bandwidth does not account for more than 1 action on a frame, so if you have limits on 2 different interfaces for the same data frame the results will not be what you expect and will likely cause unworkable delays.The recommended usage for a 2-port bridge is to have the Outside interface also be your Default interface (which is set in the "Settings" GUI tab,) and to put all of your rules on this single interface. In a typical set-up this allows for bandwidth management and fire-walling of both internal hosts and the BWMGR itself, as traffic must first come in through the bridge before it reaches the inside switch.
Groups
Group rules require some extra processing, although they are far from the biggest offenders. Avoiding nested groups can help diminish the impact on performance.URL Rules
URL rules are a powerful feature, however the use of them necessitate the "sniffing" of every http frame to decode the URL. String processing requires overhead, so if you have no URL rules you can release some CPU if you are overloading.Protocol Sniffing
"Special" protocols, like p2p, require the contents of all TCP and/or UDP traffic to be "sniffed" (or looked at) to determine what specific protocols are running, and also require the tracking of the streams after detection. While this is very powerful, it does require much more CPU than raw decoding of packet contents (such as addresses and ports) without tracking. If you are limiting by IP address only and don't care about protocol decoding, you can turn off "sniffing", which will reduce the overhead significantly.# bwmgr set sniffing offLarge Bandwidth Settings
To allow "full-wire" access, use no bandwidth limit rather than a high one (like 10Mb/s). When a bandwidth rule has a bandwidth limit, there are numerous comparisions and monitoring functions that must be done, which causes overhead. If the rule is to allow a host or traffic type full bandwidth access to a wire, use no bandwidth limit as in the following example:# bwmgr em0 -x 3000 -addr 207.11.11.1# bwmgr em0 -x 100000 -addr 207.11.11.0 -addrmsk 255.255.255.0 -bwboth 128000The above rules limit the 207.11.11 network to 128000bps except for 207.11.11.1, which is granted full access to the wire.Rule Placement
If possible, place higher traffic rules before lower traffic ones (unless precedence matters of course). This is particularly true of "global" rules, that is rules that do not use IP or MAC addresses as match criteria, and also firewall rules. The sooner a "hit" occurs, the less matching has to be performed.Customer Graph Access
Any rule with stats enabled can be configured for third-party access to the usage graph, by associating a customer with a graph.1) Create a customer in the customers tab, and give them a login and password.
2) Associate the customer record with a Rule name.
3) Have the customer access graph.php. When they log in using the login and password, they'll get the graph for the rule specified.
Setting up Mail
The ET/BWMGR uses ssmtp as its outgoing-only mailer; please refer to the FreeBSD docs for configuring SSMTP. The config file is/usr/local/etc/ssmtp/ssmtp.conf
The mailer is specified in /etc/mail/mailer.conf; you're free to use sendmail if you know how to configure it, but we don't support it's configuration.